|
|
Studio 8 includes three groups of transitions: standard,
alpha magic, and Hollywood FX. Standard transitions consist of cuts,
fades, dissolves, wipes, slides and pushes. Alpha Magic transitions
are gradient transitions where the brightness (black to white) indicates
time within the transition. Hollywood FX transitions consist of complex
3-D transitions and effects. |
|
Hollywood FX Manual/Software
|
|
Pinnacle Website
|
|
|
|
|
|
 | 03/17/03 - Audio in Picture in Picture |
| 01/07/03 - Picture in Picture using the title track |
| 12/05/02 - Picture in Picture, the Hollywood FX way |
| 11/30/02 - Picture in Picture effect without using
Hollywood FX |
|

|
|
Tips |
| Creating your own Alpha Magic transition
is very easy. The grey-scale images are 24-bit RGB JPEGs located in
the Alpha Magic subdirectory of your Studio 8 program directory.
Any JPEG added to this directory will show up in the Alpha Magic transitions
album after starting Studio 8. |
|
| |
|
The image to the right is a 720 x 480 (
NTSC) JPEG image with black letters on a white background.
Both movie clips are four seconds each and the transition
is four seconds. This means that movie clip A plays two
seconds, followed by a four second transition and finally,
the remaining two seconds of movie clip B are played. Movie
clip B will start to show where the image is black (in this
case the letters) and progress for each shade of grey until
finally movie clip B shows in the white area. |
|
|
| |
|
To illustrate the time aspect of the grey
scale, the word 'Notebook' is a gradient fill from 50% grey
to white (0% grey). This means that 2 seconds into the four
second transition (50% of the total transition time) the
word notebook will start to appear. The word 'notebook'
will complete to appear at the very end of the transition
and in this case movie clip B will appear very abrupt. A
gradient fill from 50% grey to 25% grey would start to show
the word 'notebook' 2 seconds into the transition and complete
the word 3 seconds into the transition. |
|
|
|
|
| Picture in Picture (PiP) without using Hollywood
FX is very doable. You will need to create two projects: the first
project is to create the Picture in Picture clip, the second project
is your main project which includes the Picture in Picture clip. |
|
| |
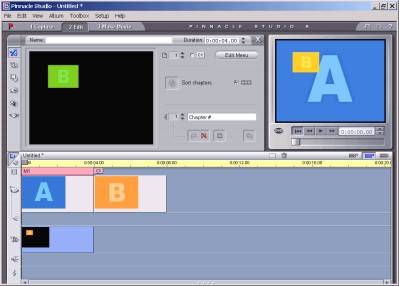 |
Place both the main clip and the secondary clip on
the timeline (not storyboard) and trim them to the required lengths.
Select the main clip, open the video toolbox and add a title overlay.
In the title editor add a button to the title overlay. I suggest
you use the Misc - Thin White Frame button, but many of the
other buttons will do to. The button will be your PIP frame; position
and size the button accordingly. Exit the title editor and you will
notice that the title track now contains a disc menu. Tick off
Use moving video for all thumbnail buttons (the filmstrip
icon) in the disc menu toolbox. Click Set chapter link for selected
button to set the start of your PIP clip. When you render this
project to an AVI file, it will both include the main clip with
the PIP effect and the secondary clip.
You are now ready to include the AVI into your main project. Trim
the end of the AVI file to get rid off the secondary clip; this
is the first reason to render your PIP effect seperately from the
main project. The second reason is that if you output your project
as a VCD/DVD, the menu will be treated for what it is; a menu and
not a video clip with Picture in Picture. |
|
|
| Audio will typically cross fade during a
transition. When you create a Picture in Picture effect,
you typically want to use one of the two audio tracks; the main
audio track or the PiP audio track. |
|
| |
Using L-cut and J-cut techniques similar to the
techniques described in the Studio 8 manual, you can either use
the main audio (L-cut) or PiP audio (J-cut). To implement the
L-cut, lock the video track and select the audio portion for the
transition. Trim the audio portion so that the duration is the
minimum of one frame. Trimming from the right or from the left
has the same effect; it changes only the duration of the audio
portion of the transition. Changing the duration of the audio
portion of the transition will automatically result in a L-cut;
the length of the main audio is adjusted. To implement a J-cut
for the PiP audio, the main audio needs to be trimmed from the
right and the PiP audio needs to extended to the left. Once the
audio track has been adjusted, the video track can be unlocked. |
|
|
| Creating Picture in Picture using Hollywood
FX requires that you have at least Hollywood FX Plus. Hollywood
FX Pro will allow to create your own effects and save them; Hollywood
FX Plus will allow you to edit existing effects. In this example we
will be using HFX Plus. |
|
| |
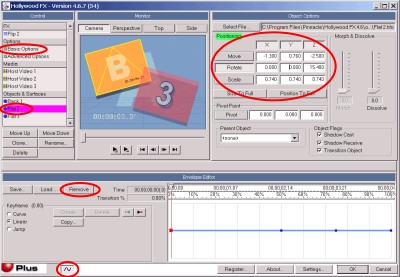 |
Place both the background clip and the PiP clip
on the story board and place the Multiwindows Flip 2 effect
on the story board. Adjust the length of the effect as required,
noting that the maximum length of the effect can be only length
of the shorter clip minus one frame. The Multiwindows Flip 2 effect
was chosen because the clip on the left of the effect (the "incoming"
clip) is used as background and the clip on the right of the effect
(the "outgoing" clip) is used as a flat object in front of the background
clip.
Select the transition and press edit in the clip properties window
to start the Easy FX Editor. To make the PiP window static, select
the flat 2 object and remove the envelope using the envelope
editor (the envelope editor can be opened and closed by pressing
the envelope button at the bottom of the Easy FX Editor window).
The location, rotation and size of the PiP can be changed by pressing
the respective buttons in the object options pane and directly entering
the values or dragging the PiP clip in the preview window. Finally,
the shadow can be turned off by turning off the Easy Lighting in
the Basic Options.
|
|
|
| A variation on the Picture in Picture method
described above uses a technique I already described for
title animations. You need at least
Hollywood Plus to implement this effect; Hollywood FX Pro will allow
you to save the effect for later use in another project (instead of
having to recreate it from scratch). This method requires the PiP
clip to be a seperate video file. |
|
| |
 |
Place the background clip on the main video track (timeline view).
Click below the clip on the title track to open Title Deco and close
Title Deco immediately by clicking Ok. This creates an empty title
on the title track. Position the title on the timeline where you
want the PiP effect to start and adjust the length of the title
to be at least the length of the PiP clip. Place the
Multiwindows Flip 2 effect on empty title and adjust the
length as required. Select the transition and press
edit in the clip properties window to start the Easy FX Editor.
In case an effect is placed on a title, the host video 1
will be empty and the host video 2 will be the title which in this
case is empty too. To replace the source of host video 2, select
host video 2 in the control pane, press Select File... in the Media
Options pane and select the PiP video file. Furthermore, you can
make any of the changes described in the above method. In this example,
I only removed the envelope of the flat 2 object.
|
|
|
|
Links
|
|
Eddy-FX - At this
site you can find various Hollywood FX transitions; some of them are free,
some of them are for paying members.
|
|
Page turn effect - Turn a page in a book with this Hollywood FX transition
from Paul Tauger.
|
|
Yahoo!Groups
HollywoodFX - Hollywood FX discussion forum; files area contains gradient
and HFX transitions.
|
|
John Rofrano's Video page - This site contains various tips and a
Hollywood FX transition collection.
|
|
|
Error Messages
|
| |
|
|